How to Create a Net Promoter Score (NPS) Survey
This is the most complete tutorial showing how to create a net promoter score survey.
It shows the exact process for setting up and launching an NPS survey for your brand.
Here’s what we’ll cover:
Before we begin, though, we must get something straight – No, NPS is not just another fad companies do because they see others doing it too.
Far from it!
NPS is that one incredibly powerful strategy that can help you learn what your product truly means to customers and find ways to align it with their needs even more.
The thing is – For that, you need to create and run an NPS survey, and that’s often where the problem starts.
So, if you’re unsure about whether to conduct NPS surveys because you don’t know what the process of creating an NPS survey looks like, this guide will put your mind at ease.
What follows is a complete, step-by-step guide to creating an NPS survey. You’ll see exactly what your NPS survey should include. You’ll also see every step in the process illustrated to make it easy to understand. And you’ll find out how to make your NPS survey a complete success.
But first, let’s discuss this…
The myth of different types of NPS surveys
“What,” I hear you ask. “There is more than one NPS survey?”
You have just heard of one single NPS survey, right? Nobody said that there are other, different, and specific types of NPS.
Let me put your mind at ease – There aren’t. There is just one type of NPS survey.
That said – There is one aspect of NPS that results in you having to take slightly different approaches when creating the survey, and that aspect is how you’re delivering it.
- You could send the survey by email.
- You could also display it directly in your product with an in-app survey.
- You can trigger the NPS survey in your mobile app.
- You could embed it on a page on your website too.
- Finally, you could share it with others with a shareable link. In this case, the survey wouldn’t trigger anywhere else than in the web browser.
In each case, the actual survey would be more or less the same. However, there might be some tiny aspects of it that you’d need to approach differently, depending on how you plan to deliver it to customers.
I mention this because, as you’ll shortly see, some delivery methods require a slightly different approach when setting up the NPS.
I based my tutorial on the most common delivery method for digital products – An in-app survey. But I have also included information on other elements you need to set up for different delivery methods.
5 elements of an NPS survey
There is one more thing I need you to know before we move on to the actual walkthrough. I need you to know what each specific component of an NPS survey is.
Because a typical NPS survey would consist of:
- The main NPS question
- An optional follow-up question or questions
- Survey logic that allows you to display relevant follow-up questions to customers
- Design of the widget, and
- The delivery method (which we briefly touched upon in the previous section)
So, let’s go through those elements in turn.
The main NPS question
The primary goal of NPS is to evaluate customer satisfaction by uncovering the person’s likelihood to recommend a product to others. It makes sense, doesn’t it? Unless you’re absolutely amazed by the product, you’re not going to be recommending it to others. And so, the primary NPS question centers around discovering that likelihood.
In fact, the most commonly used NPS question asks about that quite directly:
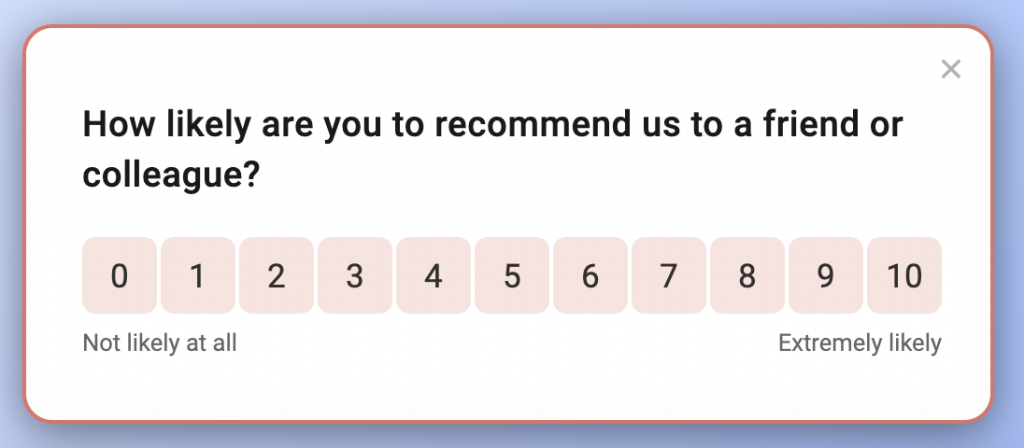
“On a scale of 0-10, how likely are you to recommend [product] to friends and family?”
There are a few things to note about this question.
The NPS question employs a numeric rating scale – Its options range from 0 to 10. All your respondents need to do is choose a single number that reflects their level of likelihood to recommend your product. This makes the NPS survey incredibly easy and fast to complete, which also results in higher response rates.
The main NPS question is simple and clear to understand. Its simplicity reduces cognitive load, making it quick and convenient for participants to respond. The clear rating scale and explicit question prompt help minimize confusion and increase the likelihood of obtaining a response.
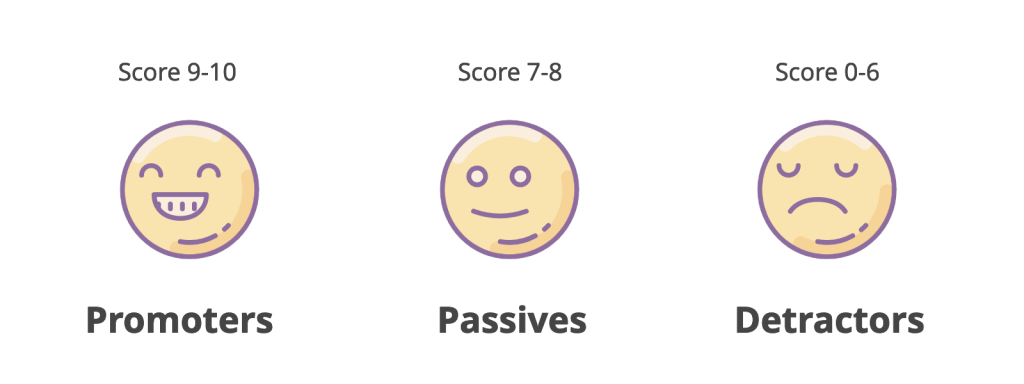
The rating question helps classify respondents into three groups based on their answers.
- People who responded with 9 or 10 are called Promoters. These are highly satisfied and loyal customers and are the most likely to tell others about you.
- People who chose 7 or 8 as their answers are called Passives. These customers are moderately satisfied and only may or may not help promote your product.
- The rest are Detractors – Dissatisfied customers whose lack of customer satisfaction may even result in sharing negative experiences about your product or service.
Follow-up NPS question(s)
The main NPS question helps you categorize a person into one of the three categories – Promoters, Passives, and Detractors. But it doesn’t tell you much about the reasons for their answer.
To uncover that, you need to ask a follow-up question.
Now, first things first – You don’t have to include a follow-up question in your NPS survey. It’s perfectly fine just to ask the primary rating question. It will still deliver an insane amount of insights about your audience, help you understand your current situation, and even identify areas of improvement.
But you can also decide to dig deeper. There is something you need to know about follow-up questions if you decide to include them:
Your follow-up question can make or break your survey, and that’s for two reasons:
- The first reason is the free form of this open-ended question. By asking to explain an opinion, you can collect entirely new insights about your business or a product.
- The other reason lies in the format of the entire NPS survey. The multiple-choice rating question reveals the situation and might indicate the “why” behind those scores. The follow-up question allows you to collect hard data on it.
But all of this can also fail if you ask the wrong question.
FURTHER READING: I’ve written a complete guide to NPS questions, which also include a list of the best NPS follow-up questions to use.
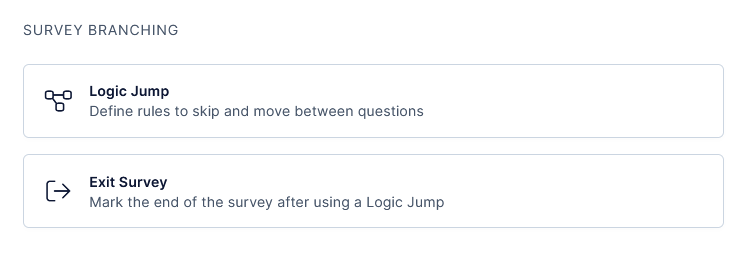
Survey logic
The term – survey logic – refers to the use of conditional branching and skip patterns in surveys. When you use skip logic, you allow subsequent questions or sections to be determined based on respondents’ previous answers, allowing for personalized and relevant survey experiences.
Here’s an example of a survey logic jump that defines criteria for displaying a particular follow-up question. In this case, only users who responded with 6 or less will see the question.
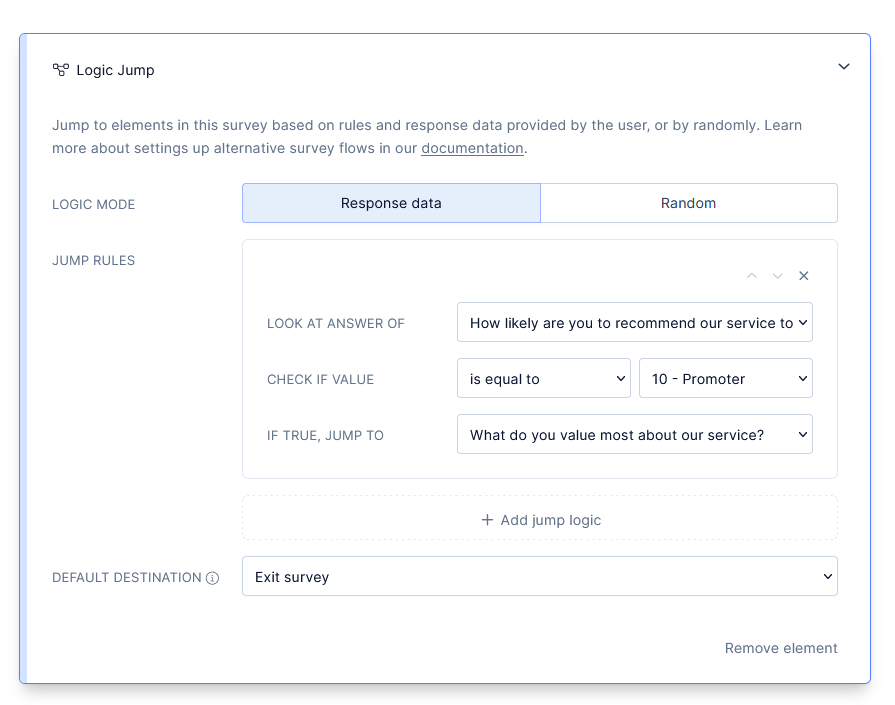
(An example of a logic jump in an NPS survey.)
Design widget
When we talk about survey widgets, we typically refer to what the user sees. Typically the widget is the box in which the survey appears. Here are just some examples of survey widgets.
NPS software like Refiner (disclaimer – my tool) offers you different options to customize the look and feel of the widget. From defining the color scheme to where the widget appears on screen, you can align it with your brand and ensure that customers will notice it while they’re using your app.
Delivery method
The final element is the delivery method. We’ve discussed it briefly in the previous section, and so, you know that there are different ways by which you can deliver the survey to your customers.
You also know that each of these methods will require a slightly different approach to how you construct the survey. For example, some methods trigger a widget. But others require you to customize the complete survey page.
In either case, the actual survey remains the same. But it’s look and feel might be different, and so can be the user experience.
(NPS setup screen where you select the survey delivery method.)
With that out of the way, I think you’re ready to see the entire process of creating an NPS survey.
How to create and conduct an NPS survey: A step-by-step walkthrough
Disclaimer – For the purpose of this tutorial, I will create a brand new NPS survey and illustrate the entire process using my tool, Refiner.
Refiner is a customer feedback and survey platform that helps SaaS and digital product companies collect, analyze, and act upon valuable customer insights.
As a result of our laser focus on surveys, Refiner is packed with all the features and capabilities that a digital product company or a SaaS brand needs to collect user feedback and measure customer satisfaction.
With Refiner you can:
- Collect more responses thanks to our highly configurable in-product surveys,
- Automate actions based on answers, and
- Find gaps in the understanding of your users and more.
Here are just some of the Refiner’s capabilities that will help you run better NPS surveys:
- Extensive library of survey templates
- Advanced widget customization options
- Advanced audience targeting and segmentation
- Launch triggers
- Conditional survey logic
- The ability to run recurring surveys
- Follow-up mode
- In-app, mobile, and email survey delivery
- Reporting dashboard
- Slack and email alerts
- Integrations, and more.
And here is the exact process of creating an NPS survey with the tool.
(Please note – For the purpose of this tutorial, I’m going to assume that you’re already logged in to the survey tool. If you want to follow along, and create the survey with me, click here to sign up for a free trial and create your first NPS survey.)
Step 1: Create a new survey
Most survey tools like Refiner allow you to create many different types of surveys. With Refiner, for example, you can create an NPS, CSAY, CES, product-market fit, and many other survey types.
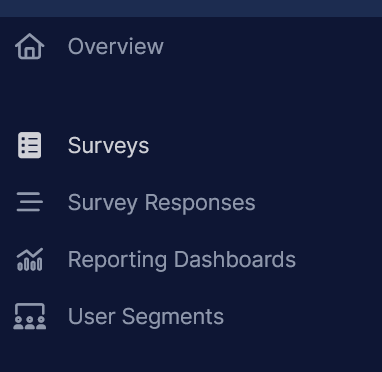
But this first step is the same for all of them. In Refiner’s sidebar, navigate to the Surveys tab.
Once there, click on the blue “Create Survey” button in the upper right corner of the browser window.

Notice that so far, we haven’t selected the type of a survey we want to run. Well, that’s exactly what we’ll be doing next.
Once you click, “Create survey,” the screen will reload and you’ll see a list of different, ready-made survey templates that you can use right away. Since we’re creating an NPS survey, select that template.
Note – Although you’re starting with a template, you’ll have the option to add, edit, and remove elements as you please. But having the template means that you don’t need to be creating the NPS survey completely from scratch, and be able to launch your project faster.
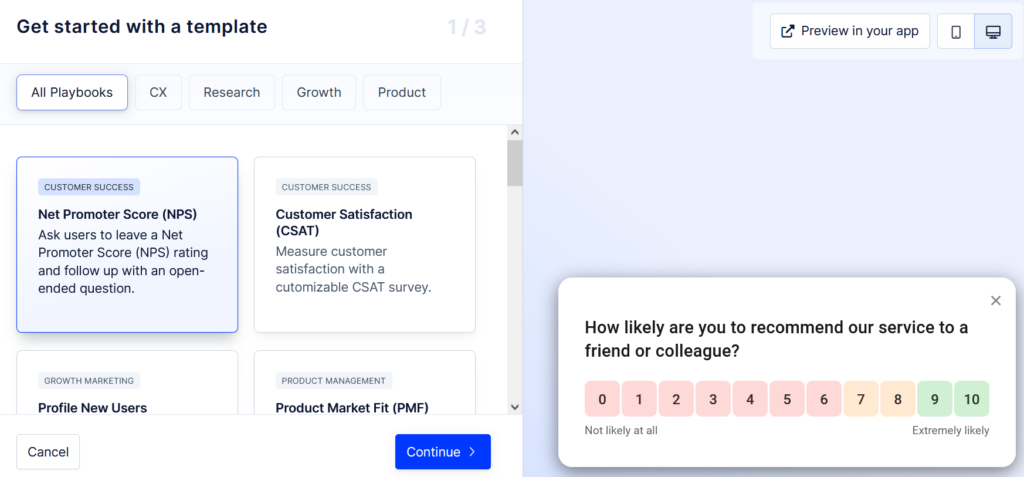
Click “Continue” to create the NPS survey, and begin the process of setting it up.
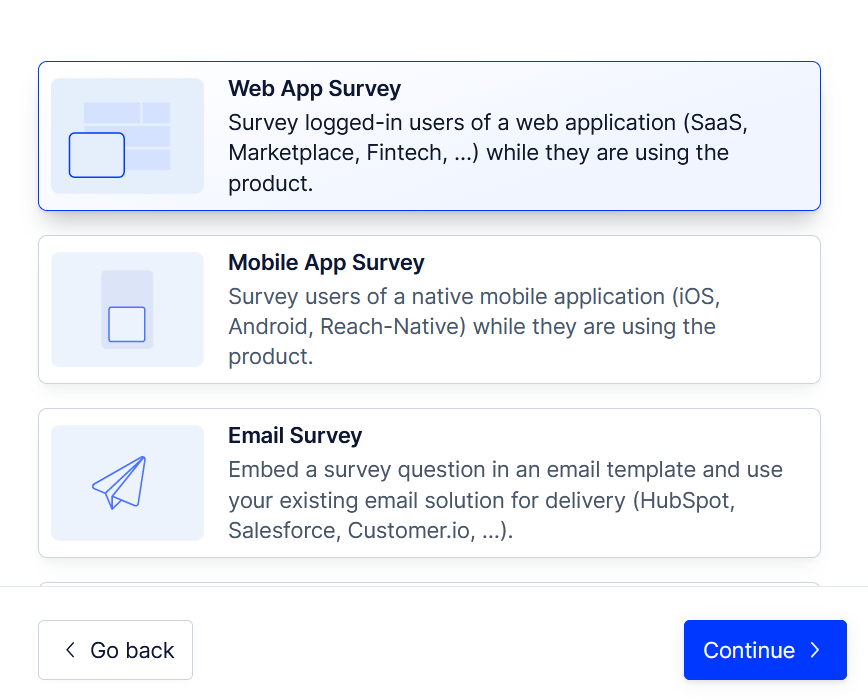
Step 2. Choose the delivery method
We’ve talked about survey delivery methods several times in this article, and that’s for a reason. The way you’re going to deliver the survey to your audience will determine certain of its characteristics.
Now, as I mentioned before, the actual survey – the NPS question, your follow-up question, survey logic jumps, etc. – will not change.
But the delivery method will affect how your survey looks, and how you’re presenting it to your customers.
(This also means that if you want to deliver the survey using several methods simultaneously, you will need to create a separate survey for each method.)
In Refiner, you can choose from six different delivery methods:
- In-app survey (or web app survey) which will appear to your customers as they use your product.
- Anonymous in-app survey which works the same as the survey above but does not collect Personal Identifiable Information (PII)
- Mobile app survey which triggers in a mobile app (iOS, Android, etc.)
- Email survey that embeds the NPS in the body of an email
- Survey link that lets you share the survey as a link they need to click to access the survey
- Embed survey which you can embed on a page of your application.
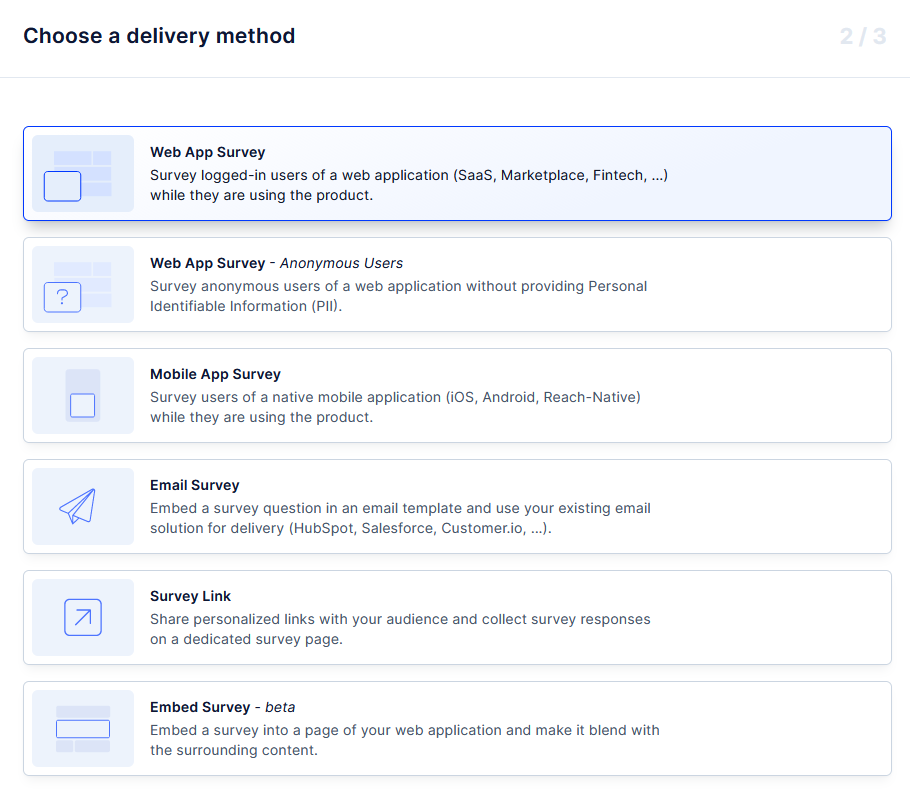
For the purpose of this walkthrough, I’m going to select a web app survey. This option will create a survey that will display for logged in users as they’re using an application.
Step 3. Give your NPS survey a name
By default, Refiner will name your new survey using the survey type. In this case, it automatically named your project Net Promoter Score (NPS).

However, you can change the survey name at any time to make it more distinguishable from other surveys you run.
To give your survey a unique name, simply click on the current name to open the name editor. From then on, you can replace the default name with the name of your project.
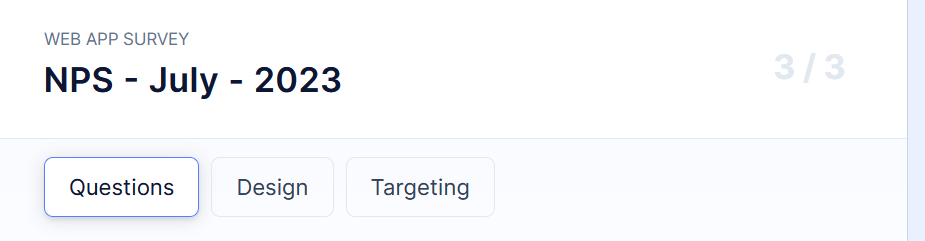
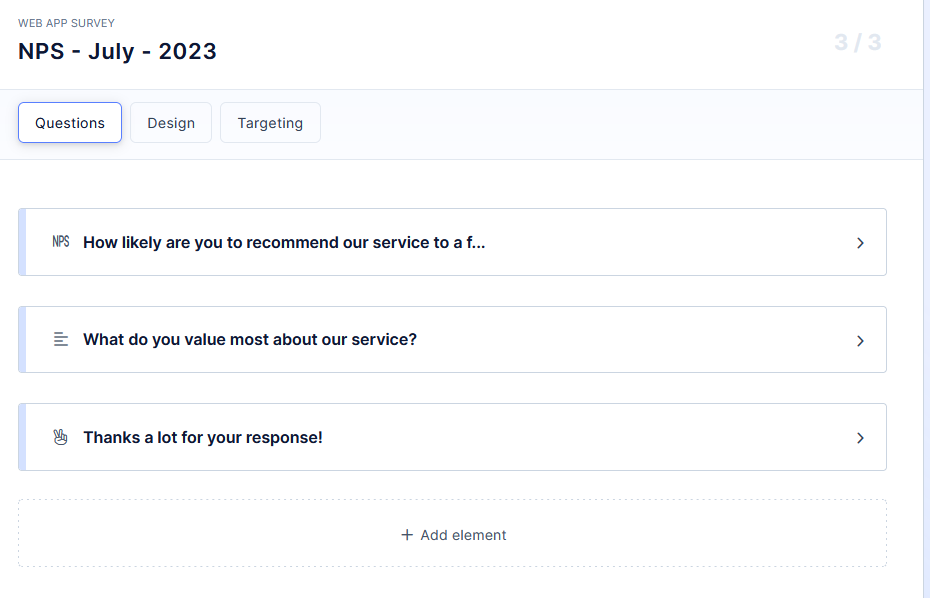
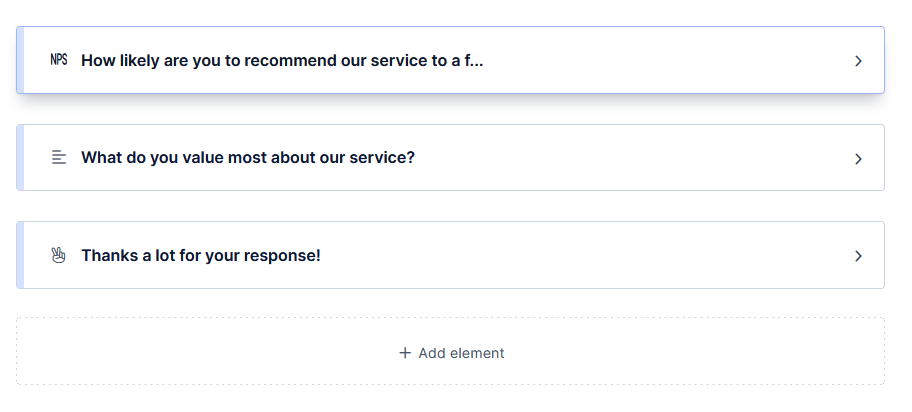
Step 4. Specify your survey questions
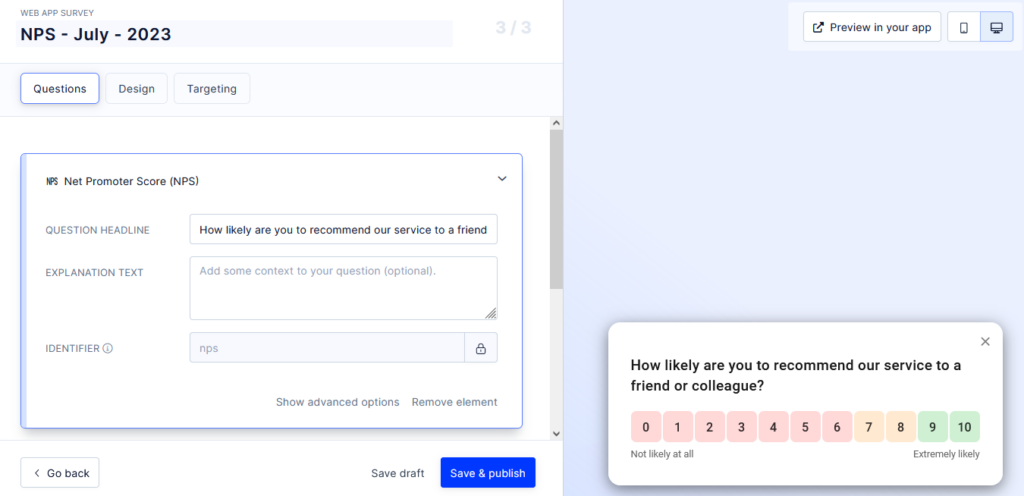
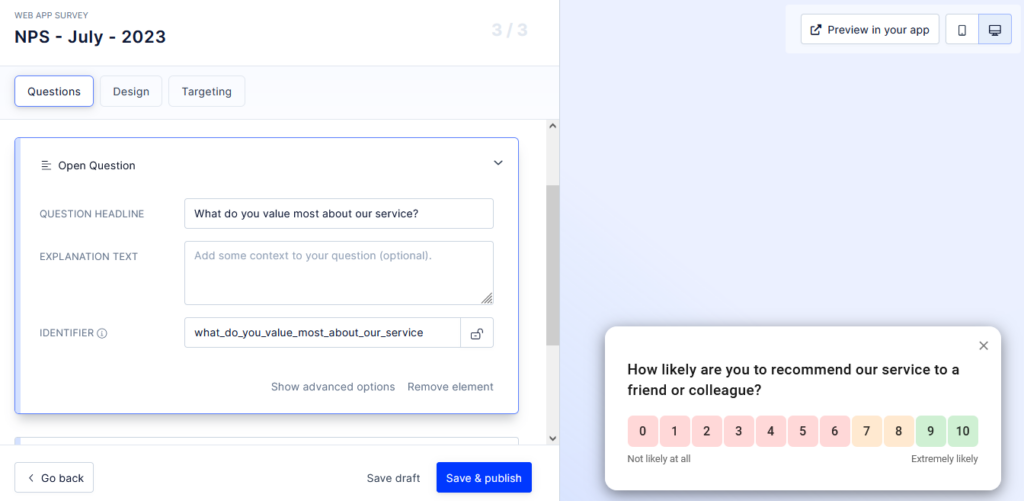
Because we’ve started with a template, Refiner has already created the basic structure of our NPS survey. If you click on the “Questions” tab below the survey’s name, you’ll see that the primary NPS question and a basic follow-up question are already there.
Clicking on either of them will trigger the preview of how each would look like in the in-app widget.
This is what my primary question looks like so far.
And this is the preview of the follow-up question.
But, naturally, you can tweak, edit, add, and remove elements of this survey. That said, I recommend that you do not remove the primary NPS question. You can’t run NPS without it, after all.
Creating a follow-up question
By default, Refiner’s template comes in with a single NPS follow-up question. But naturally, as with any template, this is the most generic and commonly used question that might not be pertinent to your situation or goals for creating the NPS survey.
You may also want to use survey logic to display the follow up to a specific group of customers, and so, in either case, you need to edit the survey. Here’s how to do it.
Click on the question to open its card. The card contains the questions itself, the option to add explanatory text (which could make it easier for customers to understand how to respond,) and an identifier (which you can use when syncing survey responses with another system.)
There are also two small buttons at the bottom of the card. One allows you to see advanced options, the other, to delete the card altogether.
To change the question, simply click on the Question Headline box, select the text and replace it with your new question, like this:
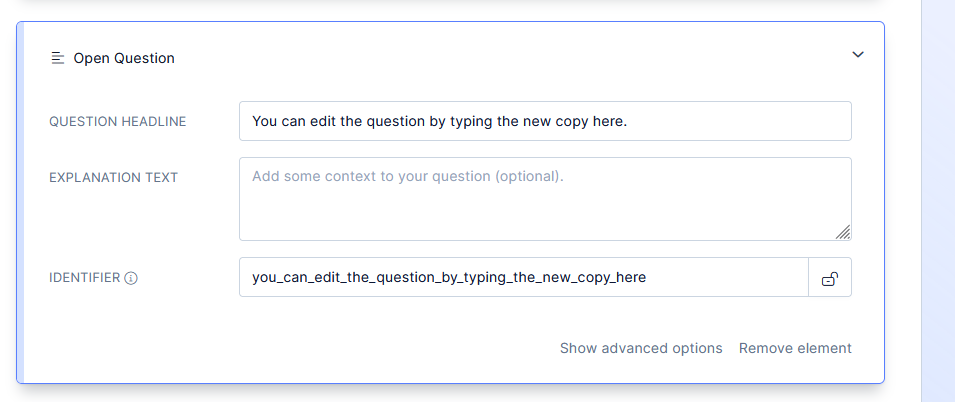
Set up advanced options. Note – this step is completely optional, and you don’t have to use it. But in case you wanted to add additional directives to your survey, that’s where you do it.
Advanced features let you:
- Set the question as mandatory. Everyone taking part in the survey will have to complete it to submit their response.
- Set the max character limit per response.
- Include a banner image, and
- Define copy for buttons.
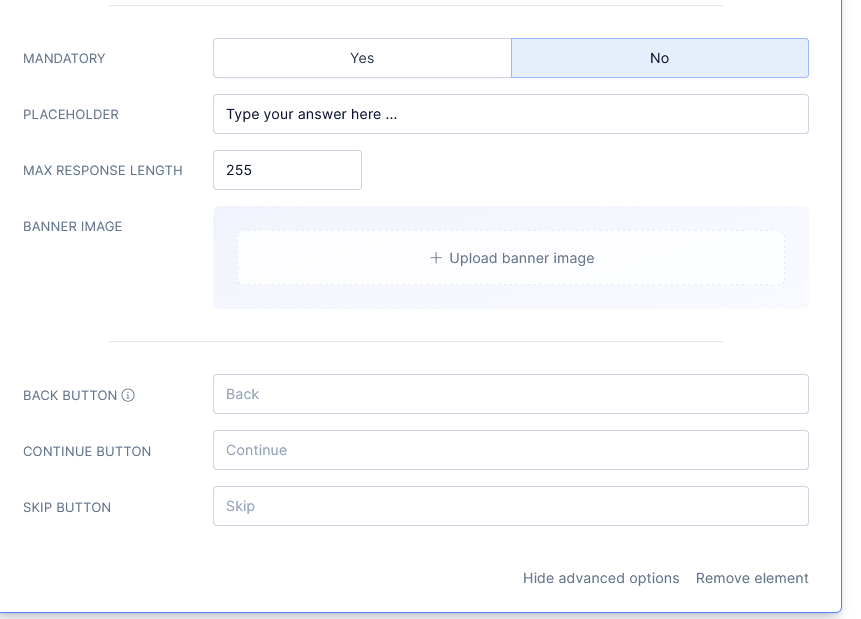
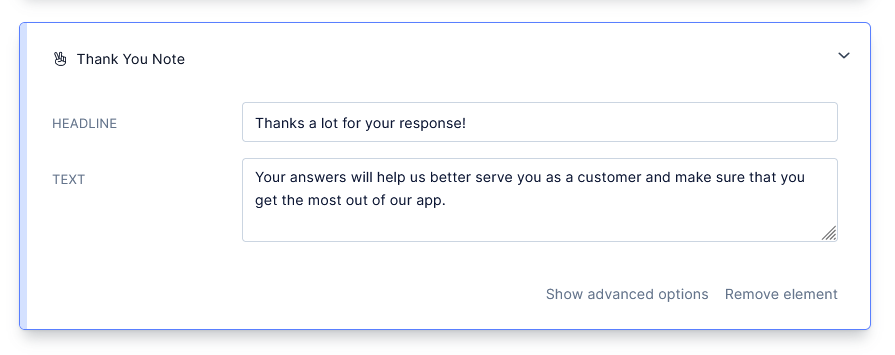
You can also specify the thank you note a person will see after they’ve submitted the survey.
Adding survey logic to the survey
I mentioned the term – survey logic – in this guide several times. You know that it refers to the use of conditional branching and skip patterns in surveys. Now, let me show you how to add it to your NPS survey.
To add survey logic, click on the “+ Add Element” button located below your survey elements.
A popup window will open, showing all the different survey elements that you can use in Refiner. Most of these relate to different question types, like rating or Likert scale questions, and so on. But if you scroll to the very bottom of the list, you’ll also see a Survey Branching section. The first option in that section is Logic Jump, and that’s the one you need to click.
Once done, you’ll see a new element added to your survey. It will look like this…
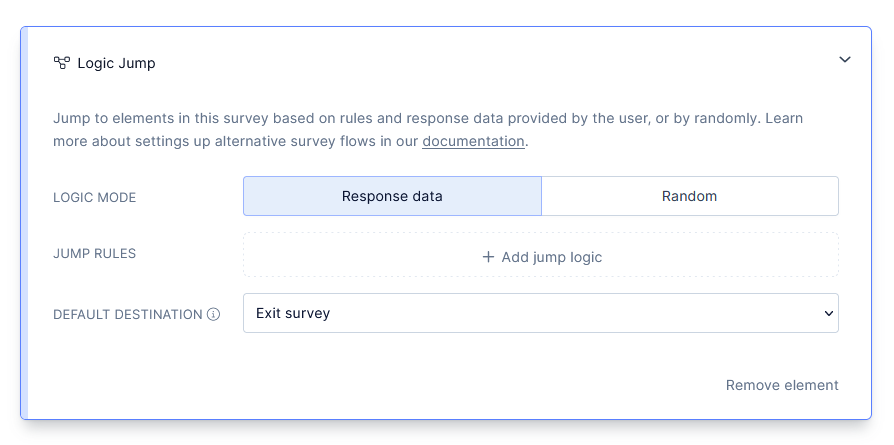
There are several new options on this screen, so let’s go through them in turn.
Logic Mode – This option lets you define the criteria for the logic jump. As you can see, you can use one of two modes – Response Data or Random.
In the Random mode, Refiner will initiate the jump logic randomly across all respondents. There will be no predefined reason or logic behind the choice.
However, in the Response Data mode, you get to decide which respondents will see the logic jump. You define that by clicking the “+ Add jump logic” button, which allows you to define jump logic based on answers to previous questions in the survey.
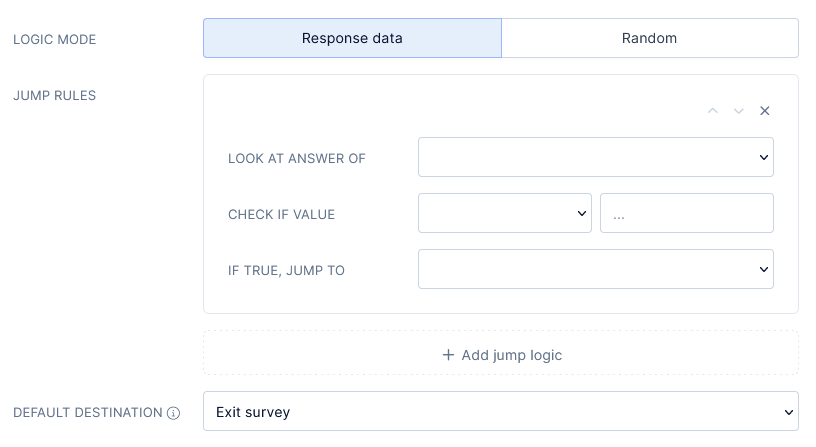
Let me illustrate this on a pre-set logic jump.
- In the example below, I’ve specified the base question to look at the answer of. In this case, it’s the main NPS question.
- I also specified that the logic jump should only apply to people whose response is equal to 10.
- Finally, I set the logic jump that for those people, Refiner would show the main follow-up question.
As you can also see, I have the option to add more logic jumps, and target different follow-up questions at people who replied with other values than 10. This way, I can create an NPS survey that collects the most relevant information from all types of respondents – Promoters, Passives, and Detractors.
Step 5. Styling the survey widget
At this stage, our survey is done and ready to go. You could launch it in the app and start collecting NPS data. But, you may want to add extra customization to the survey and style the widget to match your brand.
Let me show you how to do that, then.
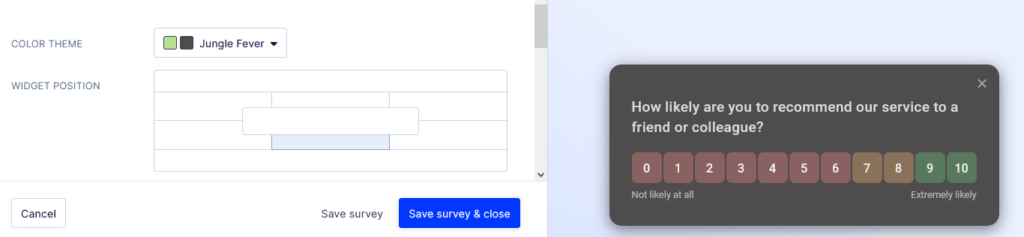
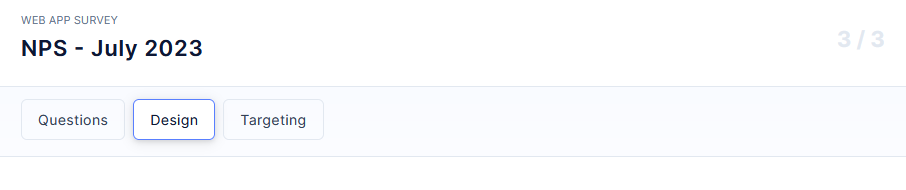
First, click on the “Design” tab in the row of options just below the survey’s name.
Refiner allows you to specify a whole range of the widget’s design elements.
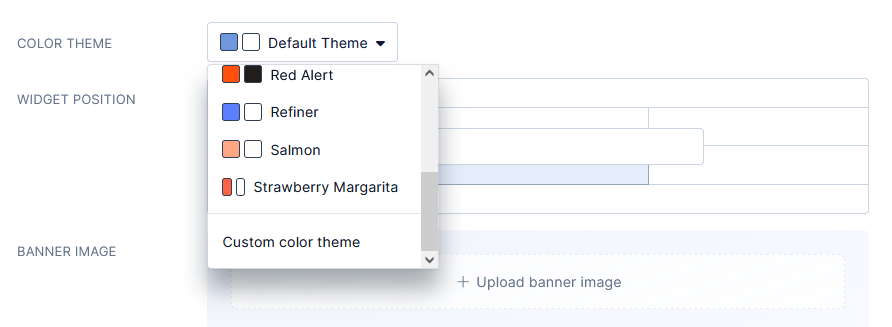
First, you can choose one of the preset color themes, or create a custom one that matches your brand.
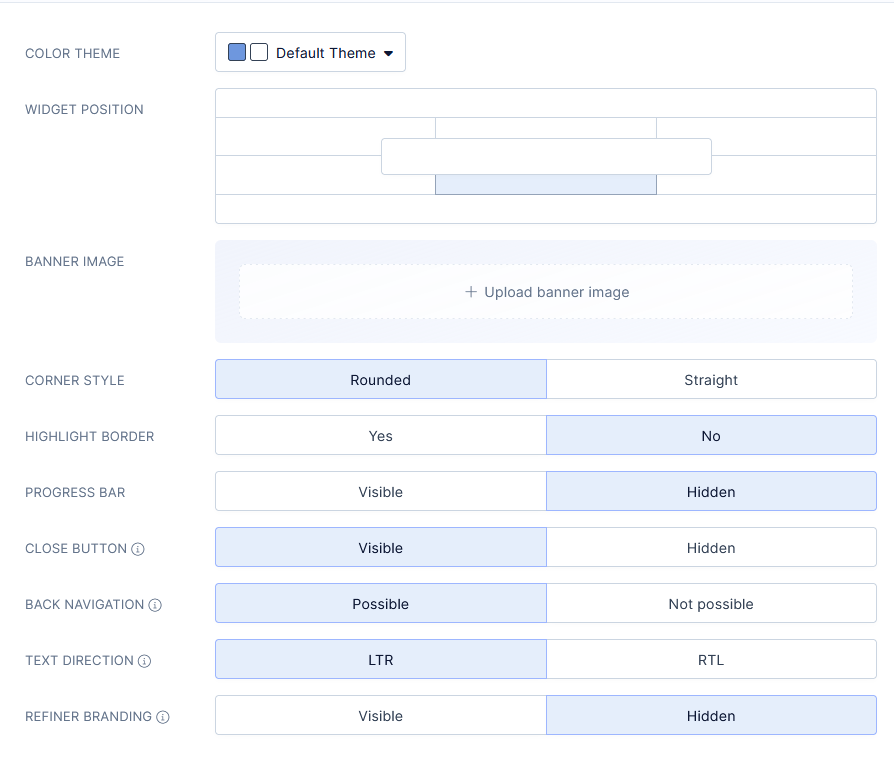
You can also choose where to display your widget – at the bottom of the screen, in one of the corners, at the center, etc.
A quick note – I admit that widget placement may seem insignificant at first. Since the widget appears in your app, it’s only logical that users will notice it. But our own research proved that it has a tremendous impact on survey completion rates. Take a look:
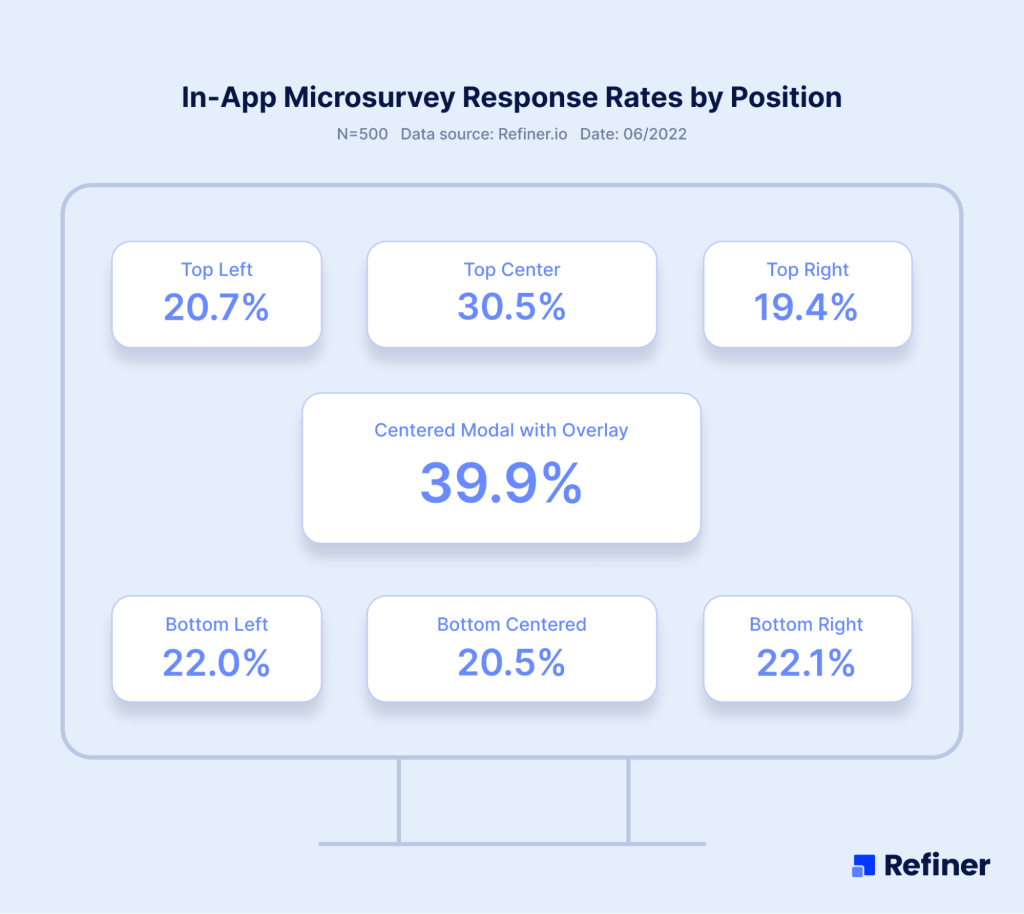
(TIP: You can see the original research data here.)
So, don’t discount placement and test different approaches to find the widget location that engages your customers the most.
Finally, you can specify a whole range of aspects of the widget – add rounded corners, a progress bar, make it more visible by highlighting the border, and so on.

Step 6. Audience segmentation and launch triggers
Sometimes, you send the NPS survey to all customers. But other times, you may want to research a particular audience segment – like your new customers or the people who have been using your product the longest.
Refiner lets you specify several segmentation options which you can access by clicking the “Targeting” tab just below the survey’s name.

Audience segmentation options
You can include or exclude specific audience segments from seeing the survey. In this example, I specified two audiences – A custom audience that I called “Happy Users” and I also decided to show this survey only to those people within that audience who completed at least one survey earlier.
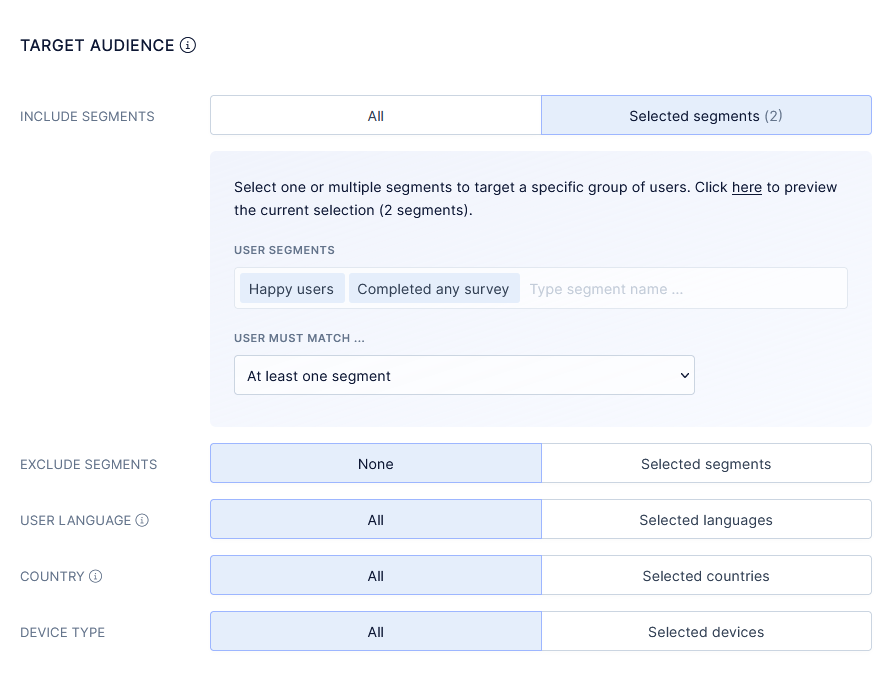
Aside from segments, you can also target users by their language, location or device type.
Survey triggers
Another option you can specify in Refiner is when to launch the survey. For example, you can trigger the survey immediately after a person logs into the app, or have Refiner to wait a predefined period of time before displaying the survey.
In fact, most Refiner users use a pattern when running NPS surveys – They trigger the initial NPS survey several days after a new user has signed up. Then, they repeat the survey 30 days later, and run it again 90 days later to see how the person’s attitude towards the product develops.
Launch triggers is the section where you can specify those times, and also run recurring NPS surveys.
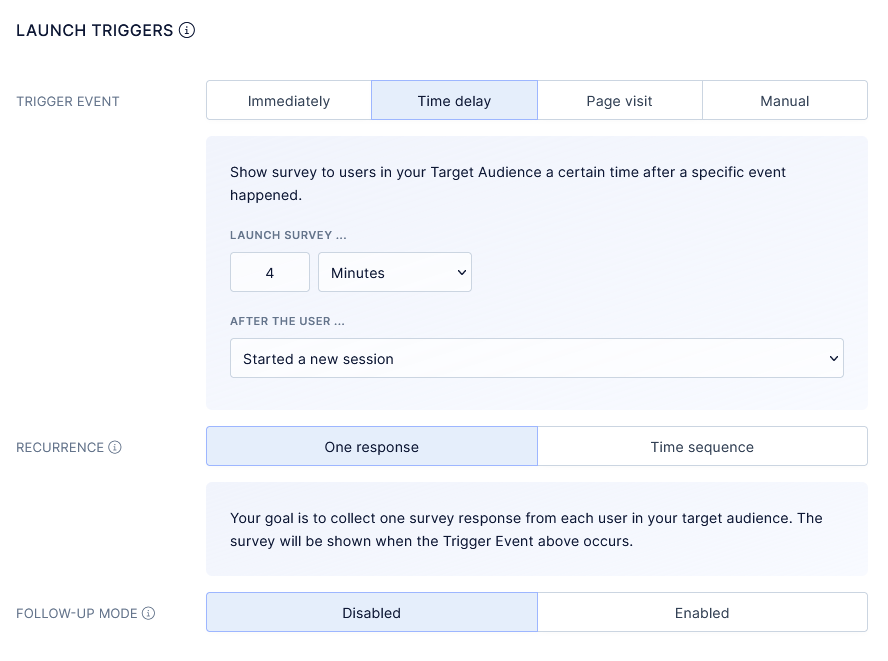
You can also specify whether the person should see the survey more than once, and switch the follow-up mode on or off.
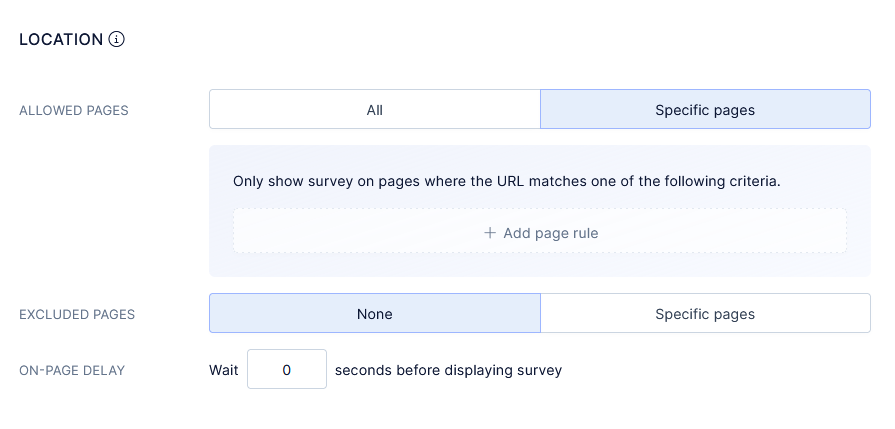
Location rules
Finally, you can also specify specific pages where the survey would show. This feature is particularly useful if you want to evaluate NPS in relation to a specific aspect of your app. For instance, you could display the NPS only on trial to paid plan upgrade screen, and evaluate your new customers’ sentiment towards your product.
Step 7. Publishing the survey
Once you’ve gone through all the options above, just hit “Save & Publish” at the bottom of the screen. Refiner will start triggering the survey following the rules you’ve specified.

You will also see your new survey on the list of all surveys you’ve created, and you’ll be able to access the survey’s dashboard directly from there.
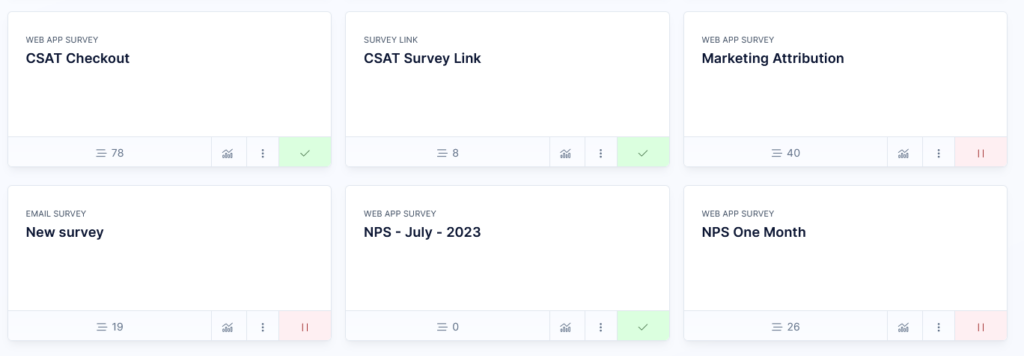
(Here’s the NPS survey we just created among other surveys I have running currently.)
How to track your survey responses
Naturally, you don’t create NPS surveys just for the sake of having them running in your app. You want to collect insights from customers and evaluate their customer satisfaction and loyalty.
With Refiner, not only you collect survey responses but you can review and evaluate your NPS score, and see responses to follow-up questions.
And you can access those insights through your survey’s card on the list of surveys. Note a little chart icon at the bottom of the card.
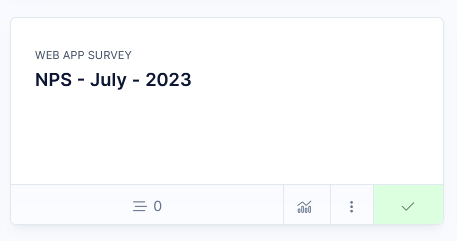
Clicking it will take you to the survey’s reporting dashboard which looks like this.
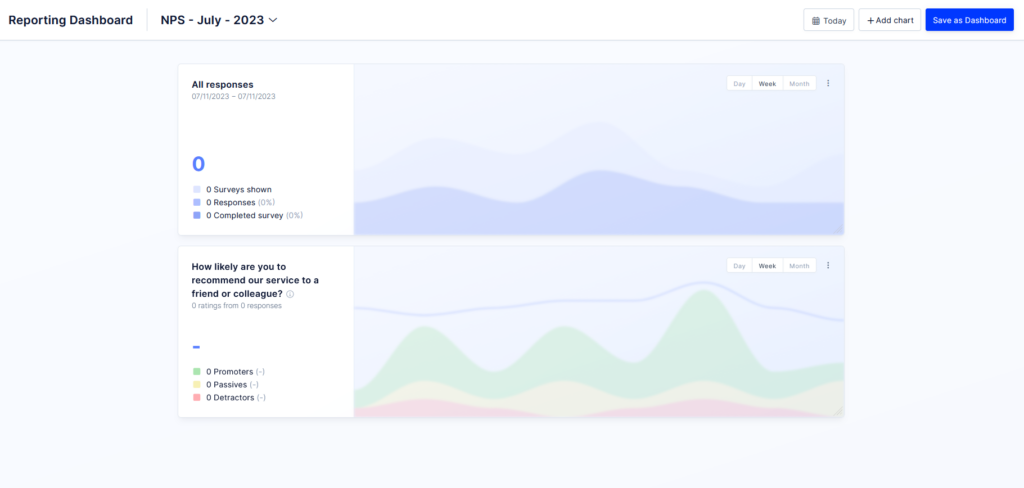
Naturally, there is nothing on that dashboard yet. We’ve only published the survey. In time, however, it would populate with survey responses and insights that will help you drive the business forward.
Another thing to remember about the dashboard is that it allows you to segment users too. For example, you can review NPS scores for free and paid users separately, or use any other segments you’ve defined in the app, and review customer satisfaction more granularly.
Other ways to leverage NPS ratings
NPS delivers incredible insights about your customer satisfaction and loyalty levels. As I said at the start of this tutorial, it is an incredibly powerful strategy that can help you learn what your product truly means to customers, and find ways to align it with their needs even more.
But there is another, often overlooked, aspect of NPS – It gives you insight into your customer base that you can leverage to drive the business forward, prevent churn, boost word-of-mouth, social proof, and more.
For instance, you can use NPS scores to identify customers to follow up with, interview, gather more insights, and more.
An example of this is reaching out manually to detractors to probe deeper into the reasons for their dissatisfaction. Granted, these might not be easy conversations. But these can highlight aspects of your product or service that you haven’t even realized to be confusing to customers.
You could also invite promoters to share their feedback publicly, leave reviews, or participate in case studies. Since these people are ecstatic about your product, they might provide a great case study.
Similarly, analyzing patterns among promoters might help you develop better customer personas, and laser-focus your marketing efforts on attracting people similar to them, and so on.
Overall, NPS is more than just a score. It’s a strategy that can help transform your SaaS and align your product with customers better.
For that to happen, though, you have to create and conduct NPS surveys. Eager to get started and create your first NPS survey? Sign up for Refiner’s free trial and launch your first NPS survey in minutes.