Install with Google Tag Manager
Introduction
Google Tag Manager (GTM) is a free tool that allows you to easily add or remove JavaScript tags to your web application without requiring any code changes. Users of GTM can install the Refiner client needed to launch surveys with a few clicks only.
Install Refiner GTM tag
To install the JavaScript SDK with Google Tag Manager, please follow these steps:
- Navigate to the “Tags” section in your Google Tag Manager container
- Click on “Add New Tag”
- Name your new tag “Refiner” and click “Choose a tag …”
- Navigate to the “Community Tags” by clicking on the banner above the tag list
- Scroll to “Refiner” and click “Add to Workspace”
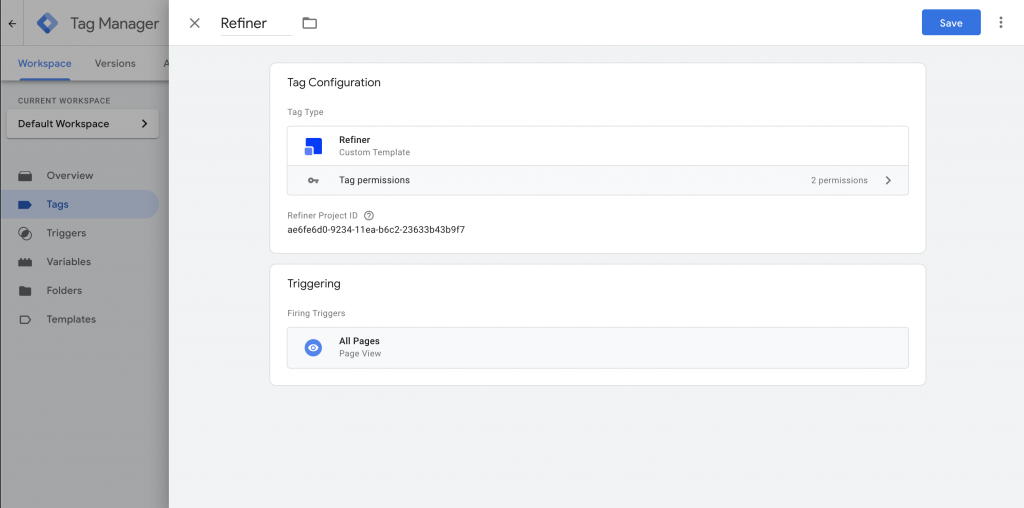
- Fill in the “Project ID”. You can find your project ID on the Installation page inside your Refiner account.
- Set the trigger for the Refiner snippet to “All Pages – Page View”
- Publish your updated Workspace
That’s it! The Refiner client is now installed and ready to launch surveys on your website.
Identify users
If you want to launch surveys for logged-in users of your web-app using GTM, further installation steps are needed. Whenever possible, we recommend to identify your users as it unlocks many features of Refiner, such as user segmentation and more data integrations as described here.
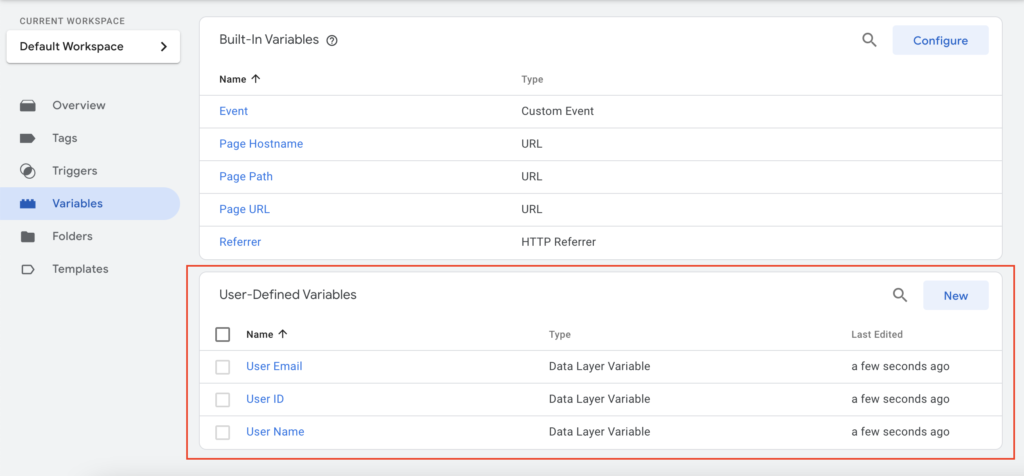
Create variables for your user data
As a first step, make sure that all user data fields which you want to send to Refiner are available as variables.
Go to “Variables” in your GTM account and check if you already have “User-Defined Variables“. If you don’t, go ahead and create one for each data field you want to sync to Refiner.
At a minimum, you need to create a variable for the identifier (e.g. userId) you’ll use to identify users. You can choose to create other variables if you want to sync more data to your Refiner account.
Map user data from to Refiner tag
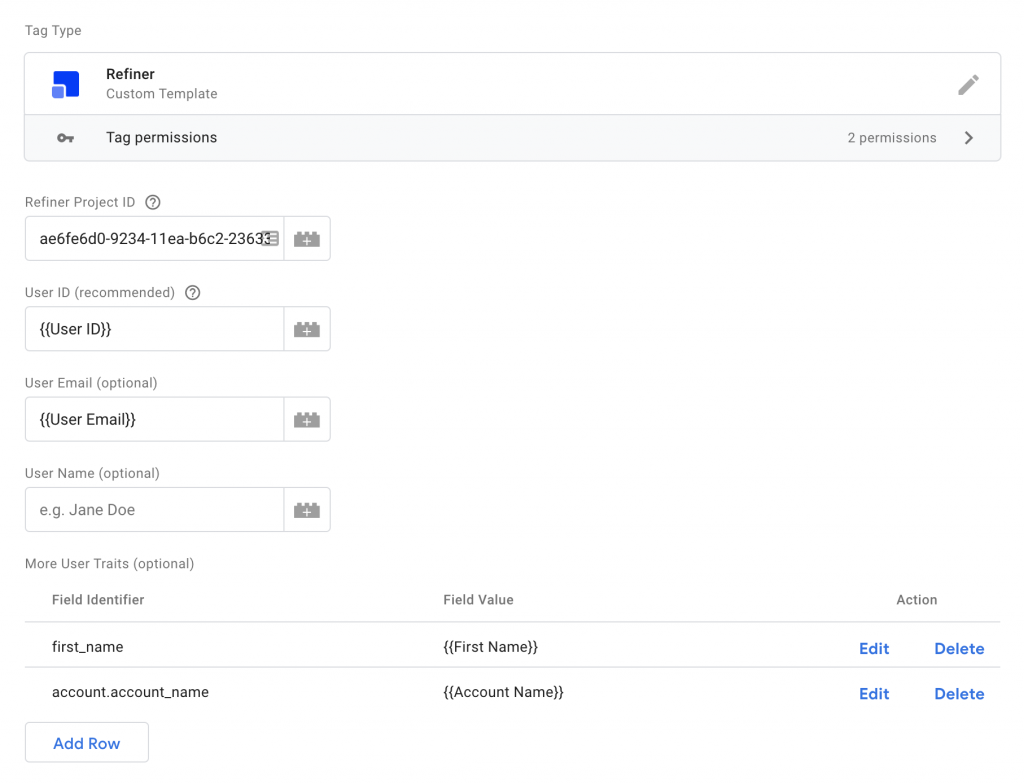
Once user data was defined with variables, it’s time to map them in the Refiner tag setup.
Go to the Refiner tag configuration panel and map the User ID or Email as shown below. You can also provide the user name.
You can send additional user traits from your User-Defined Variables to Refiner. All traits sent to Refiner can be used to segment your users and create target audiences.
Provide an Identity Verification Token (optional)
If you are using the optional Identify Verification security feature, you can provide the computed signature as a user trait using “identify_verification_signature” for the field identifier.
Please make sure to always compute the signature on the backend and never client-side in the frontend code.
You can verify that your Refiner installation works correctly by opening the Developer Console of your web browser. If you see requests to our server failing with a 403 code, your signature is not calculated correctly.
Attach data to responses
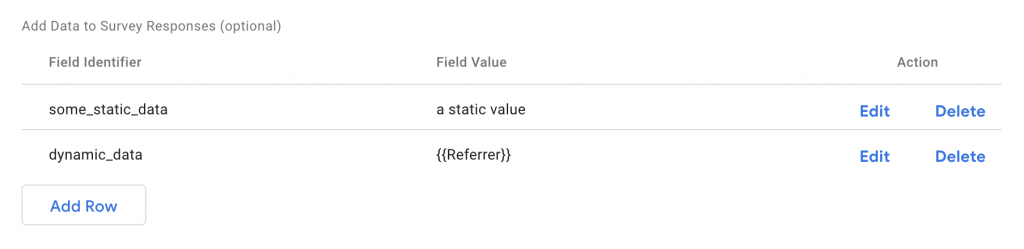
Our GTM tag allows you to attach any kind of contextual data to survey responses of your users. This data can be either static text, dynamic data coming from the Data Layer, or Magic Variables.
This option works independently from identifying your users. You can provide contextual data when surveying anonymous or logged-in users.
Track user events
To track a user event in Refiner with GTM you can create a Custom HTML Tag element which executes the following JavaScript code:
<script>
_refiner('trackEvent', 'Your Event Name');
</script>
Once you created this tag, you can call it in your GTM setup whenever you want to track the event.
Please note that tracking events is only available for logged-in users that you identified with a User ID (see above).
Troubleshoot GTM installation
If your Refiner surveys are not launching as expected, we recommend to troubleshoot your GTM installation by following the steps below.
Check if the Refiner tag is loaded
Method #1: Try launching Debug Mode
Our JavaScript SDK has a built-in Debug Mode which can provide useful information on the current state of the client.
You can enable the Debug Mode by executing some code in the browser console or with a URL parameter. Both methods are described here.
If our JavaScript client was loaded correctly, you should see a debug window telling you if a connection to our servers was established and which environment ID was set.

The debug window also tells you whether the client is currently operating in “Identified User” or “Anonymous User” mode.
Method #2: Check the HTML document
If the Debug Mode described above is not showing any information, the Refiner client is probably not loaded correctly to your HTML document.
Open the developer console of your browser and navigate to the “Elements” tab. If you search for “refiner”, our JavaScript tag should show up as shown below.
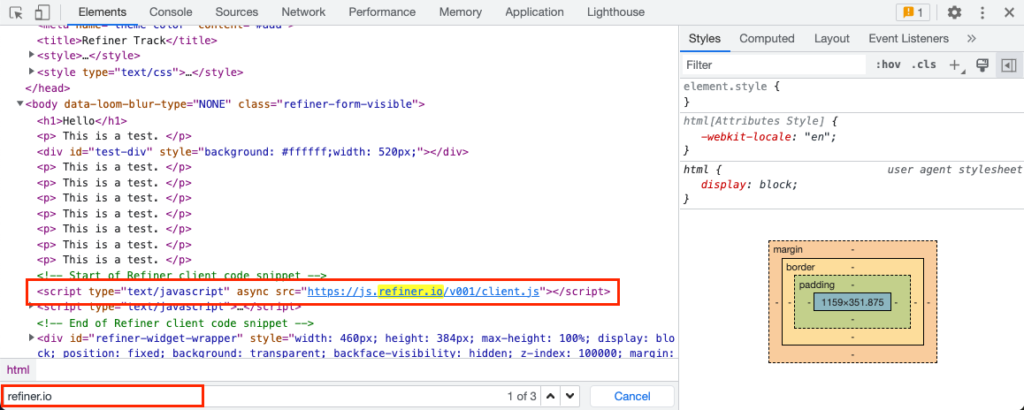
If the JavaScript tag does not show up, it means that the Refiner tag was not loaded by Google Tag Manager.
To resolve this issue, go to your GTM account and check that you published your latest changes and that the trigger event for our tag is set correctly.
Method #3: Inspect network tab
You can inspect the network tab of the developer console to check if the Refiner client was loaded.
Open the Developer Console of your browser and navigate to “Network”.
Setting the filters of the request filter to “Fetch/XHR” and searching for “refiner” shows all communication between your browser and our backend servers.
If you see requests to the api.refiner.io, it means that our client was loaded successfully.
Clicking on a request gives you access to the Payload (screenshot below) and the Response of our servers.
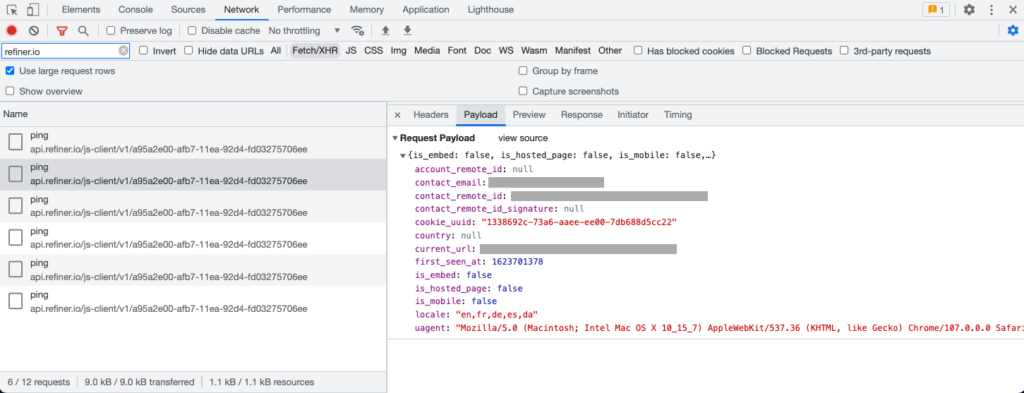
If you are identifying your users, the Payload of each request should have a value either for contact_remote_id or contact_email.
All requests should end with a 200 or 201 status response code. If any of the requests are marked with a 4xx or 5xx error, click on the them to reveal the response of our server.
You can make a screenshot and send it to our support team for further assistance.
Delay loading of the Refiner tag
When you want to identify users, it is important that the GTM Data Layer is populated with user data before the Refiner tag is loaded.
Depending on the technology your web application us using, the GTM Data Layer might get populated asynchronously and user data might not be available on page load. If this is the case, you need to delay loading the Refiner until user data was provided by your API.
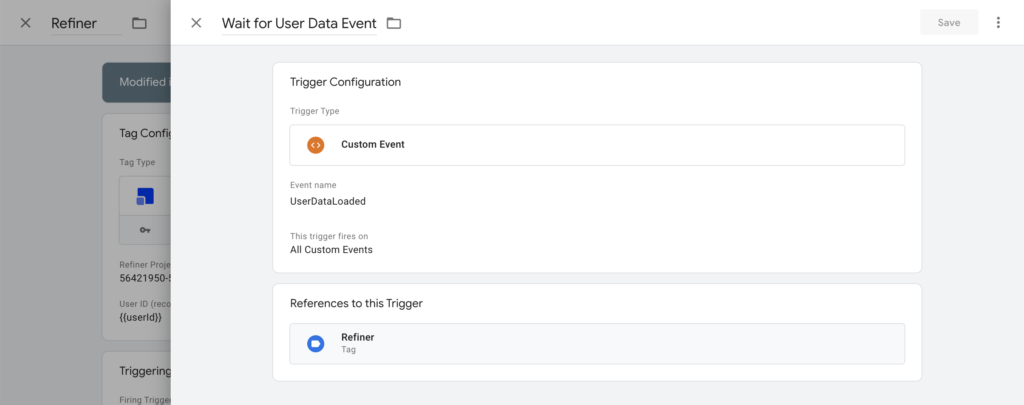
Method #1: Fire tag after certain event
The most reliable way to delay loading of the Refiner tag until user data is available is to use a Custom Event Trigger.
Your app might already emit an event to the GTM Data Layer which indicates that the user data was loaded, for example “User Data Loaded”.
If this is the case, you can use the event as in Triggering section of the Refiner tag as shown in the screenshot below. You can ask your developers if such an event was implemented for your app.
Method #2: Use a Timer to delay loading
If no custom event is available in your GTM account which would indicate that user data is available, you can also simply delay the Refiner tag for a couple of seconds. You can do this by using the Timer Trigger.
Usually, delaying the Refiner tag by 2-3 seconds after page load leads to reliable loading of your tag.
Follow these steps to implement a time delay for the Refiner tag:
1/ Navigate to Triggers and click on “Create Trigger”.
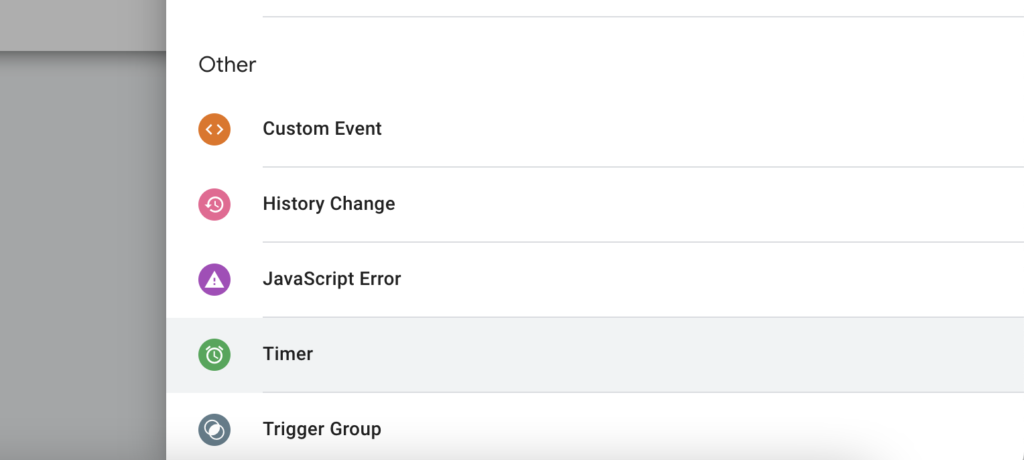
2/ Choose Timer as the trigger type.
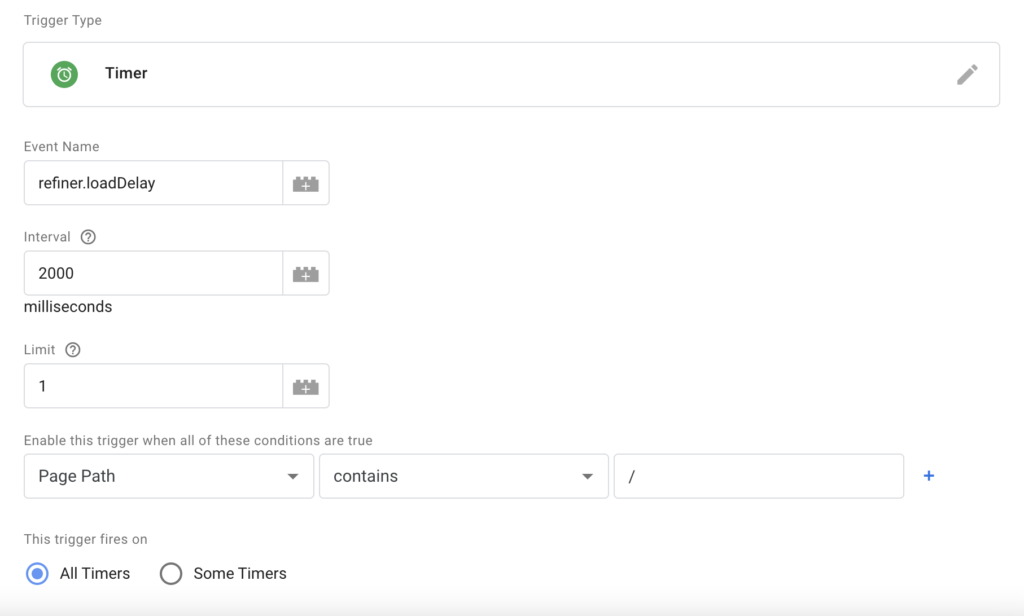
3/ Use the following settings for the Timer trigger:
- A distinct name, e.g. refiner.loadDelay
- Delay to 2000 – 3000 milliseconds
- Limit = 1 to prevent loading the tag multiple times
- Page Path set to “contains” and “/” to load the Refiner tag on all pages
4/ Save the Trigger and head over to the configuration of the Refiner tag
5/ Click on the “Triggering section” and locate your newly created Trigger
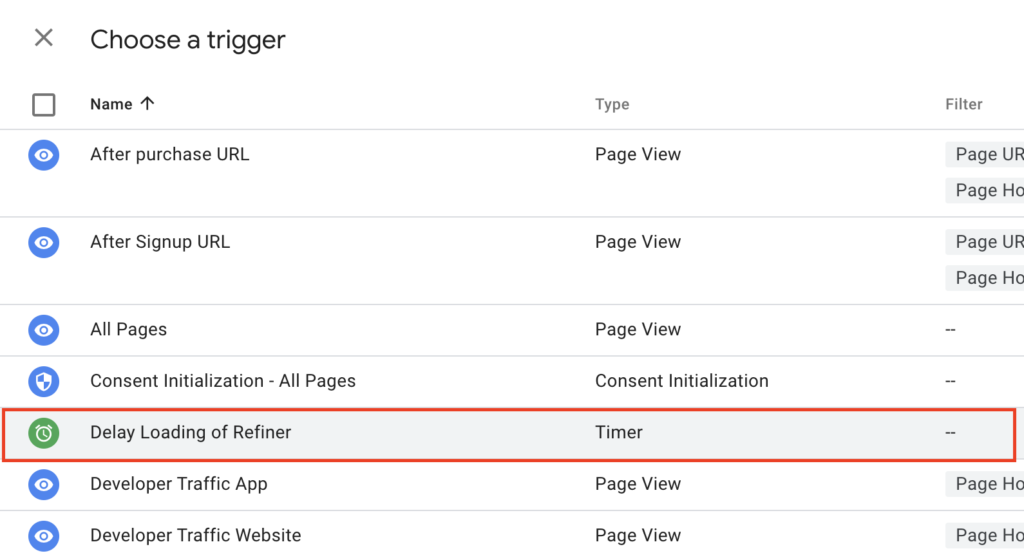
5/ Choose your newly created Trigger in the Triggering section
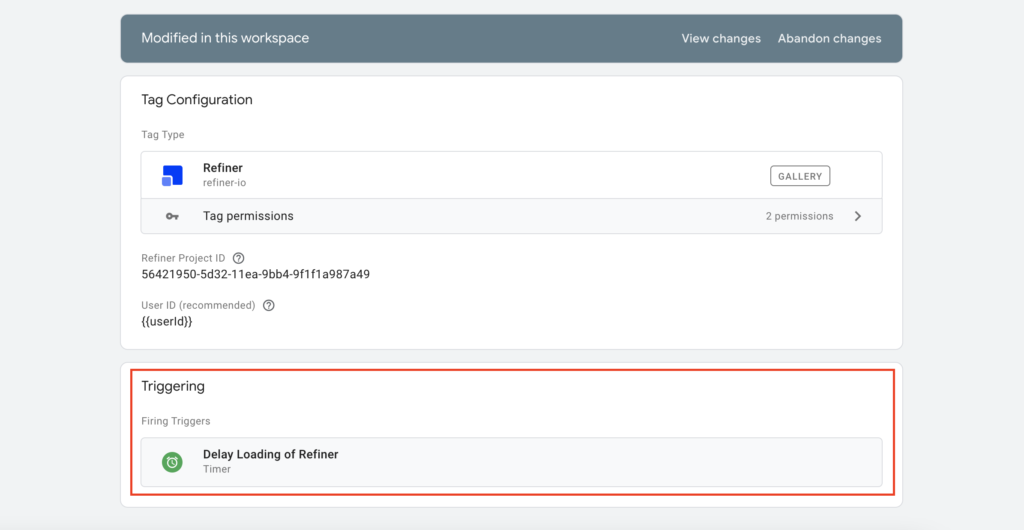
5/ Save your tag configuration and publish the changes
If you have any questions or need a helping hand installing the Refiner client with GTM, please don’t hesitate to contact us.